Introduction
It’s common task you have to control a 12V LED strip (consuming more than some milliamps) using a 5V/3.3V signal from a microcontroller.
It is not possible to drive directly from the output pin of a microcontroller. To achieve this goal, we need some basic power interface. We can use a MOSFET.
This post is based on the following discussion in Electronics StackExchange: Mosfet usage and P- vs N-channel
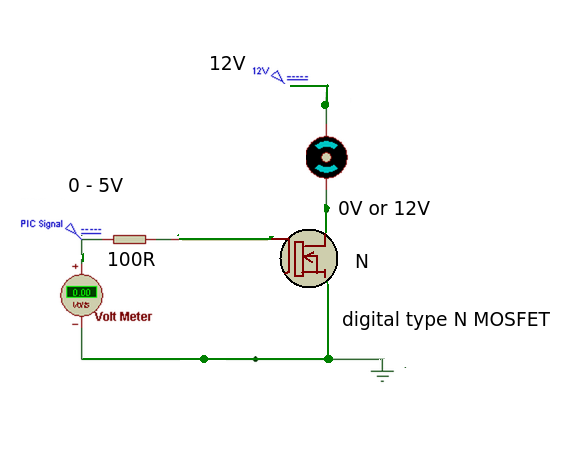
N MOSFET circuit (LED strip connected between +12V and Drain)
When the microcontroller output is HIGH the MOSFET is turned ON, when it is LOW the MOSFET is turned OFF. The series resistor has been made smaller to aid the turn ON, turn OFF times by charging or discharging the gate capacitance more quickly.
I figured out there was no need of an anti-kickback diode across the load, since LED strip would not be an inductive load.

Some N channel MOSFETS we could use for this task are:
- P55NF06 (60V 55A)
- FQP30N06L (60V 32A)
Arduino Example
Once we have connected the N MOSFET according to above diagram, we can use an Arduino PWM signal to control the brightness of a LED strip.
The Arduino IDE has a built in function “analogWrite()” which can be used to generate a PWM signal. The frequency of this generated signal for most pins will be about 490Hz and we can give the value from 0-255 using this function.
analogWrite(0) means a signal of 0% duty cycle.
analogWrite(127) means a signal of 50% duty cycle.
analogWrite(255) means a signal of 100% duty cycle.
On Arduino Uno, the PWM pins are 3, 5, 6, 9, 10 and 11. The frequency of PWM signal on pins 5 and 6 will be about 980Hz and on other pins will be 490Hz. The PWM pins are labeled with ~ sign.
See Arduino analogWrite() function.
See Arduino PWM tutorial.
Arduino code
//Initializing LED Pin
int led_pin = 6;

void setup() {
  //Declaring LED pin as output
  pinMode(led_pin, OUTPUT);
}

void loop() {
  //Fading the LED
  for(int i = 0; i < 255; i++) {
    analogWrite(led_pin, i);
    delay(5);
  }
  for(int i = 255; i > 0; i--) {
    analogWrite(led_pin, i);
    delay(5);
  }
}
